My friend Olivia, emailed me asking if I could help her figure out how to do a specific Korean hairdo! I was excited for the challenge, and borrowed my sister's head of long straight hair to play with.
After searching and finding many beautiful updos online, I found that the style we were trying to recreate was called a "chignon" - I think! Which, loosely translated means, "bun".


Flip that little independent braid up over the french braid and out of your way! The rest of the french braid continues as though the little braid was never there. :)
Once you have taken up and added a piece of hair down by the ear - stop adding and just braid like normal for awhile to finish off this braid.

Here you can see the part a little better. I didn't part this beforehand, this is just where I stopped adding hair to the french braid.
Notice I never did add any hair to the left side of that braid, just the right.

Next pull all the hair (except that first small braid) into a low ponytail.
Use a good strong hair tie for this ponytail to help give the rest of the hair something sturdy to anchor to.

Other side! Nice and smooth.

Braid the ponytail!
 (Notice little Q back there?! lol She was pointing at "Auntie's" hair and talking about how she wanted to have her's done next - and watch the "puppy movie, fox?!" :) aka, Disney's The Fox and The Hound!)
Once the hair is braided, flip the whole thing up.
It's tempting to just twist it around like a normal braided bun, but I really think there's a specific look to it when you start by flipping it up. I learned this from the first video on youtube listed in the resources at the bottom of this post
(update: that youtube video is no longer online so the link has been removed from the bottom of this post)
Bobby pin it here if you need/want to.

Then start bringing the braid around the elastic.

(it would be nice if Daisy's hair was a bit longer for this style.)
Pretty much the last step (before accessorizing!) is to bring that very first little braid around under the chignon (bun) and bobby pin it!

Remember this?

How's this?
 LOL - ok, so I know it doesn't really look much like it at all. I think part of the problem was that Daisy's hair was just too short. Longer hair would have given us a longer braid and more to wrap around.
I toyed with the idea of trying to add some "hair extensions" or yarn in the middle of the braid to make it thicker. That might work, but it wouldn't solve our length problem. If you had human hair extensions that looked good, then you wouldn't need to hide them and you might be able to get some extra length that way. After all, using wigs is traditionally Korean! :D
Ok, now the other side.
Remember this??
How's this??

There is also the possibility of trying to make two braids instead of one, therefore cheating the length :) However, I didn't do this because I thought each braid would be so small around that they would look funny. I don't know! It would probably be less "authentic" but maybe it would work?
After searching and finding many beautiful updos online, I found that the style we were trying to recreate was called a "chignon" - I think! Which, loosely translated means, "bun".
After my initial reaction of "Wow! These are beautiful!" My next thought was, "is all that hair REAL?!" lol As it turns out, there are traditional wigs that people, especially royalty, did wear in order to get some of the fancy, huge, traditional Korean updos. However, this practice was pretty much left behind because of the neck strain caused by the heavy human hair pieces! Even to this day, some movie directors choose to forgo the wigs and let their movie be less-than-historically-accurate rather than risk using the heavy wigs! There is one place that still makes and refurbishes these traditional wigs - you can read (or use google translate to read!) about it HERE!
(resource: Ask A Korean)
I also learned that the head piece worn by the girl in the picture is traditional, yet not all that common. It is called a bae'ssi daeng'gi. Which gets it's name from the pear shape of the ornamentation. :) The chignon (bun) is very common, however!
Now on to the style! Here's our version and the How To steps we took to create it.
In my research of Korean styles - I found this picture...

(www.askakorean.com)
I'm not sure if it's the same 'do or not, but I wouldn't be surprised! So we added the braids into our style as well. (I didn't have any pictures of how they started the braids at the top of the head, so I just made that part up!)
Here's a "before" picture so you can see the length of hair I had to work with...

(Oh goodness, my house is messy!!)
I had brushed it all out (yep, with a brush, lol) and then parted it down the center to her crown.
(kind of hard to see in this picture, but you can tell it's parted because the hair is hanging down instead of trying to go back.)
Then I sneakily took a bit of hair out right here ...

and braided it!

Then I started french braiding. Here's the tricky part. I took a starting piece of hair up by Daisy's forehead and parted that into my 3 strands to braid.
Then in this picture you can see that I added in more hair on the right side (by her face) but NOT on the left (hair hanging straight down) --This is Crucial! (lol, well, only if we're copying the second picture!)
At this point in the following picture - I have started the french braid, added one piece to the second "stitch" and now am holding the first braid...
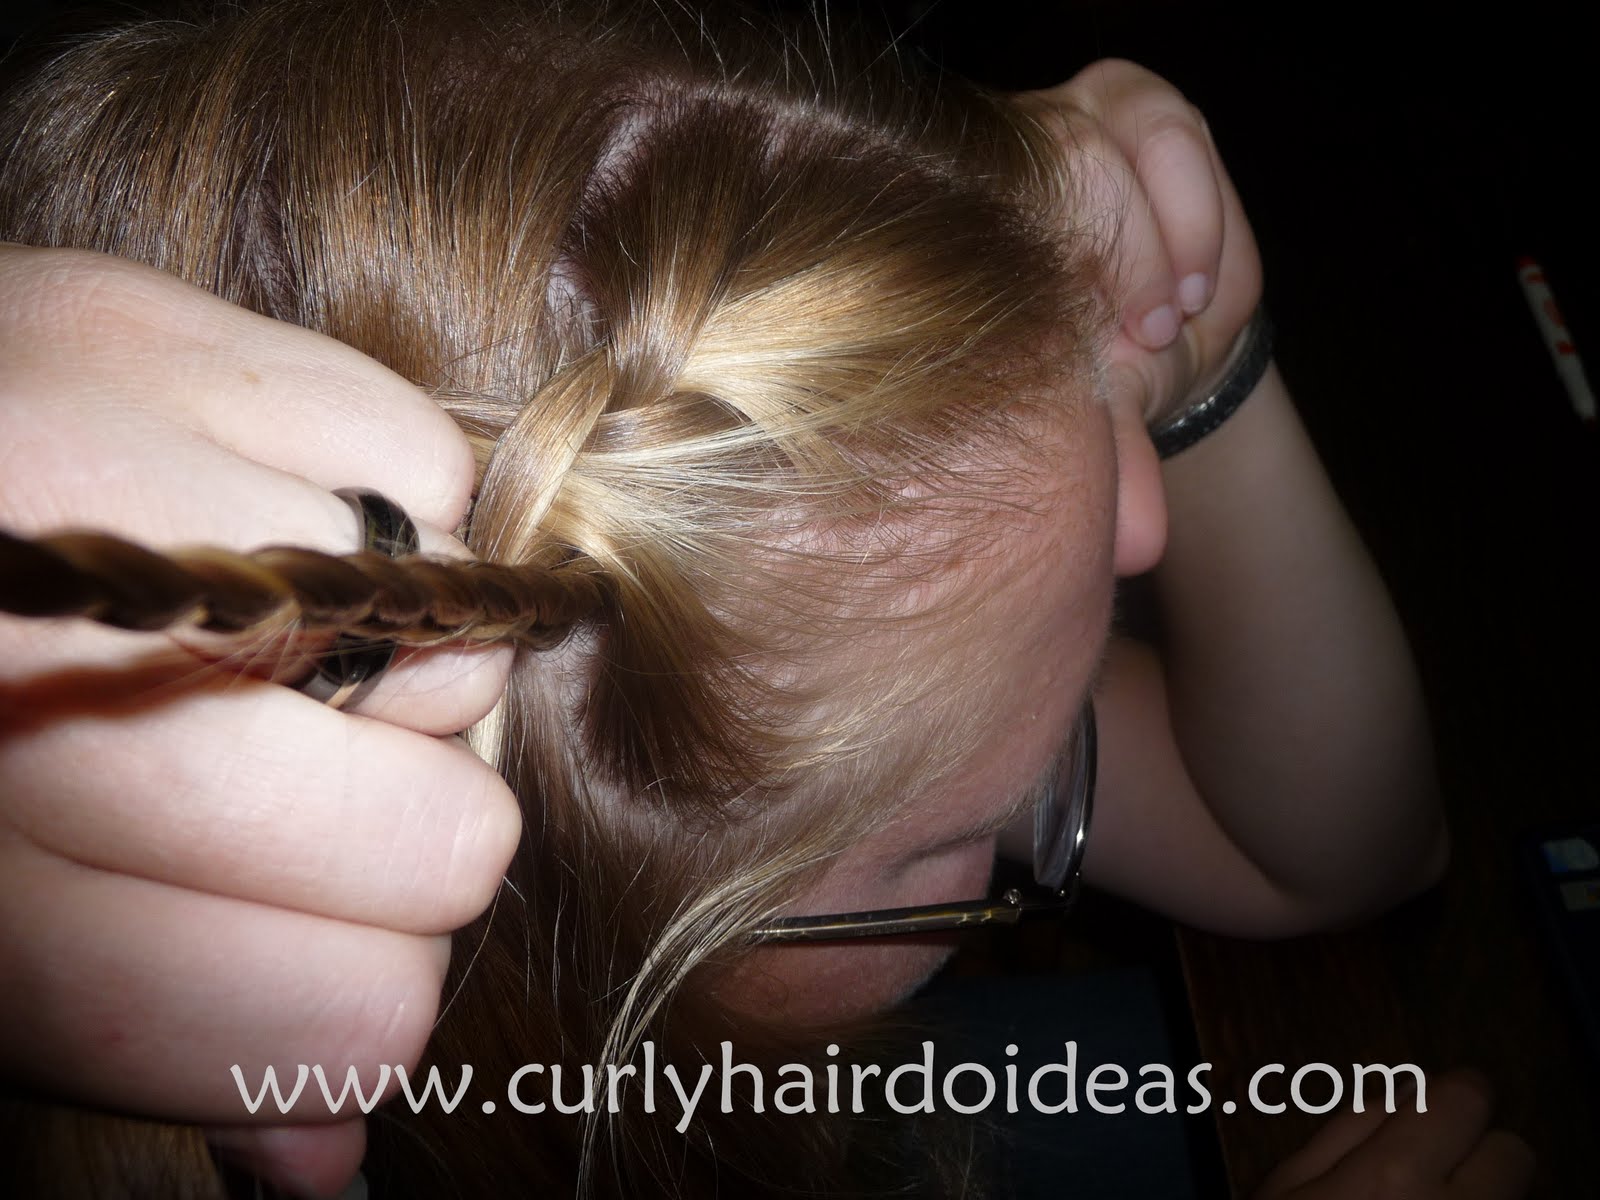
Flip that little independent braid up over the french braid and out of your way! The rest of the french braid continues as though the little braid was never there. :)
Once you have taken up and added a piece of hair down by the ear - stop adding and just braid like normal for awhile to finish off this braid.

Here you can see the part a little better. I didn't part this beforehand, this is just where I stopped adding hair to the french braid.
Notice I never did add any hair to the left side of that braid, just the right.

Next pull all the hair (except that first small braid) into a low ponytail.
Use a good strong hair tie for this ponytail to help give the rest of the hair something sturdy to anchor to.

Other side! Nice and smooth.

Braid the ponytail!

Once the hair is braided, flip the whole thing up.
It's tempting to just twist it around like a normal braided bun, but I really think there's a specific look to it when you start by flipping it up. I learned this from the first video on youtube listed in the resources at the bottom of this post
(update: that youtube video is no longer online so the link has been removed from the bottom of this post)
Bobby pin it here if you need/want to.

Then start bringing the braid around the elastic.

(it would be nice if Daisy's hair was a bit longer for this style.)

Pretty much the last step (before accessorizing!) is to bring that very first little braid around under the chignon (bun) and bobby pin it!

Remember this?

How's this?

I toyed with the idea of trying to add some "hair extensions" or yarn in the middle of the braid to make it thicker. That might work, but it wouldn't solve our length problem. If you had human hair extensions that looked good, then you wouldn't need to hide them and you might be able to get some extra length that way. After all, using wigs is traditionally Korean! :D
Ok, now the other side.
Remember this??
How's this??

There is also the possibility of trying to make two braids instead of one, therefore cheating the length :) However, I didn't do this because I thought each braid would be so small around that they would look funny. I don't know! It would probably be less "authentic" but maybe it would work?
We didn't have the proper traditional Korean hairpieces, and that would change (help!) the look a bit, but we made do with what we had!
I would LOVE to see this style on you!! If anyone feels like giving it a try, please post pictures to our facebook page! I'm soooo curious how it would turn out on longer hair. Or if I even got it right at all! LOL
For more fun reading on Korea and Korean Hairdo's visit these sites!
Ask A Korean - by far the most interesting Traditional Korean hair information I found on the web. Has some pictures of different styles and interesting little facts to go along with it!
Korea.net - "Gateway to Korea" - tons of info, tons of links! Not much about hair, but definitely worth checking out if you are interested in Korea at all!
www.soompi.com - Soompi, a division of Viki Inc., is the world’s largest and longest-running English online media providing complete coverage of Korean pop culture. Founded in 1998, Soompi has become the ultimate authority for all the latest news on Korean celebrities, music, TV shows, movies, and style, as well as a respected organization that works closely with major Korean entertainment agencies to bring you exclusive content.
Life Capsule - a crazy snapshot of some Wild Traditional Styles! These are all wigs and were worn by people in the palace!
O. M. G. blog - Pictures of Traditional Korean Hairstyles (I found these exact pictures in about 3 different places on the web!)
O. M. G. blog - Pictures of Traditional Korean Hairstyles (I found these exact pictures in about 3 different places on the web!)
and, of course, youtube.com! I'll let you do more searches here on your own, if you're interested - and Let me know if you find this particular style that we're attempting to do today!! - but first - THIS video has a few different amazingly intricate traditional styles. Enjoy!
Thanks so much! What a tremendous amount of effort you put in! And... do you know those "braids" your can buy? At least over here, you can buy human hair braids at the Chinese market. They only come in black, of course, but that is OK for me. I think I will buy one or two of those, and experiment. I do have the right hair pins, but when I am looking at this, I am definitely lacking in hair!
ReplyDeleteI don't doubt that the style in the picture used some artificial hair, but definitely less than some of the other royal styles you see!
Do you see the red band? When do I put that in?
Thank you so much, again!
You're welcome! It was fun! I learned a lot, too :)Yeah, definitely try adding the braid extension - I think that would help alot.
ReplyDeleteDid you watch that first youtube video? I think that is just about the same style (only modernized, more messy and not braided) So I think you would put the red band in right after you flip the main braid up (before you start wrapping the braid around.)
oh! I know!! Take a look at the second youtube video, they don't tell you how, but they show someone getting those royal hairdos done up - WOW! They are intricate! and what crazy wild wigs! LOL! Love it!
I actually just concluded how they made this bun... and it is a TOTAL cheat! From the look, it kind of looks like two braids, but not quite - did you see that too? Well, if you click on the "ask the Korean" blog, you'll see the round wig I think they used for this bun. It's basically a round braid, just wrapped around the hairstick...
ReplyDeleteYeah, I saw that - but I thought it was bigger! oops! I thought it was the wig that went way up and over that lady's head (in the picture right above it the wig pic on Ask A Korean)
ReplyDelete.... either way, you could probably take those braid extensions you were mentioning and do the same thing with them! (wrap it around your own braid) in order to get that really full look.
Another idea to try (I would borrow Daisy again, but she's going off to college!) is to make two braids out of the one ponytail and wrap them. I don't think it would look quite right either, but it might be closer. Especially if you could get that first upward sweep in somehow (where they add the first clip.) IDK! It's fun to play with anyway. I like trying to make styles work with just our natural hair, I wouldn't want to wear a wig for normal everyday wear! But I like the style enough for the day-to-day... ya know?
I know! I guess we should all be patient and wait for our hair to grow even longer :). Have you got any hair sticks? If you can't get any, I'd be happy to send you one!
ReplyDeleteso pretty so sad I had my hair cut I cant tide like that
ReplyDeleteThis is brilliant! Yes, I do believe that with longer hair, it would look more like the original Korean version but it already turned out so beautiful as it is :) Thanks for the step by step photos!
ReplyDeleteI saw this the other day and thought - I could totally try that!
ReplyDeleteMy hair isn't much longer than your models and I did it a day or two after reading this, so wasn't eaxtly sure what you did, but it's sorta similar, i wanted a side bun and didn't have the sticks, just a flower clip from Hawaii.
http://picasaweb.google.com/lh/photo/u23yrxc_k4FbyQMbkmSXTg?feat=directlink
http://picasaweb.google.com/lh/photo/UZWTsTi4UfYaFirBFP7y1g?feat=directlink
Andrea!! That is so pretty! I absolutely love it! I like that it's so loose and soft - and the side bun really makes it "modern" or something. Thank you for sharing!!! :)
ReplyDeleteI have now finally got the hang of this style! It's pretty great! Now, if I work out how to take a good picture of myself, I'll send it to you... Oh hang on, there is one. Check your mail!
ReplyDelete:)